Sunday, October 05, 2014

Seven Sisters

The seven sisters is as much of a Crowsnest Pass icon as Crowsnest mountain itself.  However, the peak may be more of an ambience setter for it's larger neighbour than a destination in and of itself.

The seven sisters was first climbed in 1951 by Bruno Engler.  This ascent would have happened a number of years after his time working as a ski instructor in the Waterton (late 30's to early 40's for 2 seasons) then Blairmore area (early 40's - about 4 or 5 seasons).  Engler did a number of routes in the area that he termed quite difficult and maybe a bit haphazard.  It is speculated that this included some of the short routes at the Blairmore Riverside crag and some unknown alpine routes, perhaps around the Ptolemy - Parish - McLaren area.  I've also found out he climbed the seven sisters on a route he considered extreme.

See one of Engler's pictures with Fritz Frei here (Not sure about where that would be on the sisters, as none of the summits have that type of bridge with an open backdrop….  My guess is that it was a staged shot somewhere on the peak.  Probably on the top of the ridge, but not yet on the main (6th) summit tower)  UPDATE: Here is the actual location of the shot - right side of pict.  

The only other reports I've heard of seven sisters ascent are a 2008 attempt by Rick Collier (no summit pyramid done), and a 2014 early Sept solo ascent (unknown friend of Raff's and unknown summit tower, likely the main 6th one, climbed at 5.6).  There's also fairly good reason to suspect that Martin Krippl & Greg Hooge from Lethbridge may have done one of the summits in the 80's (they had done a number of technical ascents in the southern area during that era).


Height: 8,501
View-o-meter: 4/5
Scrambling Difficulty: 5th class
Total Trip Difficulty: Moderate
Best Feature: The desert towers of the Rockies
Worst Part: Rotten rock

Approach
Drive up the Allison creek road to the normal Crowsnest Mtn. start.  Allison creek road is a paved road that leaves highway 3 just west of Crowsnest Mtn.  Continue pass the Allison creek campground.  About 5km past the a compressor station a good dirt road spur takes off on the right.  Follow it for about 500m, parking where the road first touches a cut block  (49.710202, -114.604285).  Hike up an old narrow logging/jeep road which marks the start of the Crowsnest Mtn trail.  The first opening you come to - an open slide run - is the easiest way to approach the main stack of towers.  A large weakness in the bottom cliff band makes for a technically easy talus approach.  (see left side of below image).

The easiest approach is straight up the old slide run

(If you're doing one of the south towers, follow the Crowsnest Mtn. trail until it leaves the tress, then sidehill to the col.)

Our Detour
Instead of following this route to the main summits, we decided to try to gain the topmost talus slope and traverse the ridge just under each of the seven towers (see google images to see what I'm talking about).  While the towers look connected to the lower cliff bands, there is a large continuos talus slope that runs under them all.

The three gullies which bar approaching a pure traverse


Unfortunately, the images from Crowsnest underestimate the climbing on the 3 approach gullies and an apparently feasible southern ledge system.  The rock on the southern ledge system is horrible, and there are some solid 5th class blanks here and there.  Perhaps a closer look in summer would yield a viable way to ascend the southern arete, but I wouldn't hold my breathe.

We decided not to try to run out one of the icy gullies and rapped down to reach the main talus slope between the 1st and 2nd cliff bands.

The traverse along the coal band and up higher under the sisters is actually pretty nice.

Coal intrusions and high sulfur content rock make for horrid looseness.  Up high things get better.

More Context
The number of summits is actually pretty deceiving when traversing.  Each tower seems certain to be the biggest and last.  However, they just keep coming.

The southern flank of each of the towers would prove extremely difficult.  Only one tower had a feasible southern line.  On each tower obvious climbing routes occurred on the north part of the towers and occasionally on the west or north-western face.  I'm not sure I believe reports of summit ascents from the south-west.  My guess is people have been mistaking west for south-west.  

Ascending the Seventh Sister (or the first if you count from the north)
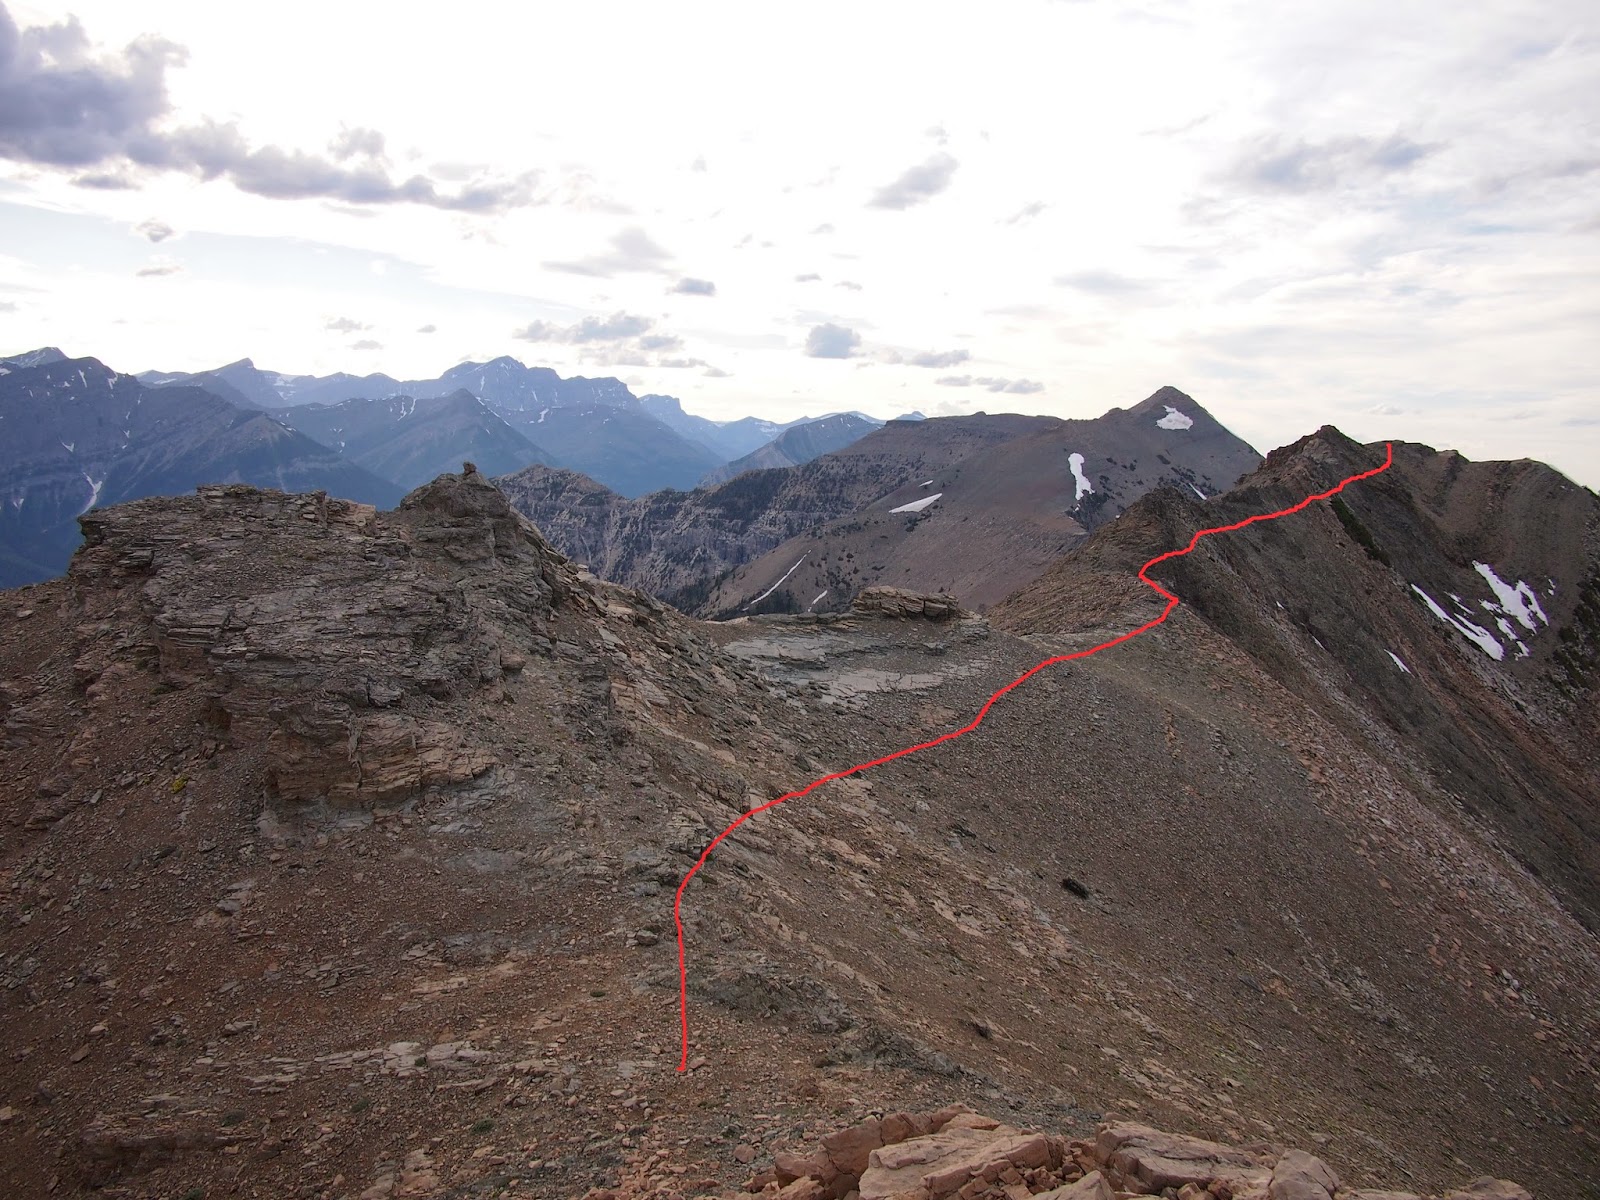
Traverse along the coal band until you get to a talus slope that breaks through the second cliff band.  Angle up to the top of the ridge.
The talus slope in the center.
Traverse under a series of towers along a faint sheep trail and on 2nd class talus slopes.  There are two or 3 traverses that have some exposure for 3-5m.  However, only one is narrow enough to necessitate side shuffling and hands (4th class).

Nice ridge lines throughout.
Uncertain as to which pinnacle was going to be the last sister, we traversed all the way to the most northerly one.  With conditions such as they were, the last, and perhaps easiest sister seemed good for the day. 

First pitch of seventh sister (5.4 / 5.6 / 4th class)
We had a false start for the first pitch, and ended up opting for what look like a rope-dragger of a pitch to tackle a key off-kilter fist crack flake (and first guarantee of pro).  Luckily we didn't have to head to the fist crack.  Two marginal pieces of gear led an exit onto the arete.  Once on the arete there was 5m of bulgy steps followed by a 5m section of large wafer edges. On top of the wafers we found a very good belay.  On the way down we set our rap above the bulgy steps at the base of the crux wafer face. 

Overall, while gear wasn't good, there was enough to keep you from falling off the mountain.  In the summer you could almost scramble this section.  However the wafer section is solid 5th class soloing with a deadly 30-60m bounce.  The chances of wafer breaking are also pretty high.  It would be a heady scramble.  However, there is a large ledge right below, so you never know….

On top we noticed the start of a cairn on the sixth sister.  This might have been from the 2014 Sept long weekend solo ascent.  Trevor asked if we should build a cairn on the summit.  None of the summit rocks seemed to have never been disturbed.  I said "Why ruin it for someone else? It's nicer the way it is - undisturbed"  

We down climbed 10-20m of 3rd class terrain with two short 4th class sections and got a solid hex from which to start the first of two 30m raps.

We followed the north ridge's talus down to what looked like an easy exit point.  Unfortunately a band of fossil limestone blocks easy exit from the upper talus ledge system.  We cut around to the east and, instead of picking our way through that fossil algae band or walking another km to find a break, rapped off a good horn.

The fossil algae band blocks the way for a clean and easy ridge traverse
While you could avoid descending the fossil algae band by following the talus ledge back to Crowsnest (and your car) , we had earlier decided to follow alpine meadows to the north west.  Descent through the trees was pretty easy.  A good game trail avoided getting caught in the steep sided creek drainage.  The last 500m through the trees was a bit aldery, but nothing terrible.  

The seventh sister from the north west
In hind sight, the quickest way down from the 6th or 7th sisters would have been to head straight down the talus and do a 30m-90m rap through the bottom cliff band visible in the image above, but out of sight when descending.


The Sisters

While I could be off, here's my best recollection of pictures and tower numbers (as measured from south to north….).  Here's the best image I've found from which to do the numbering (many other images seem to only show 6 towers/sisters).  Note the linked picture is taken from the east, while my description and most people come at things from the west.

Sister 0
North side shown

Un-numbered minor sisters right (south) of the first sister (as numbered s to n).  The 1st sister's south face is partly visible on the left.

If you look at the above picture and the gap between the right-most pinnacles  you'll find where Engler's 1951 staged shot was.  Unless he did all the easy towers, I doubt he ascended that nubbin.  The location of the climber in the 1951 image certainly isn't on the obvious ascent route.  From the location and shadowing the image was taken early in the afternoon.  I doubt they would have taken the time, prior to their main peak, to head up a small tower and risk having to leave some rap cord.  Chances are they needed some shots for the day. Just behind the notch is a very long drop down the east face.  A rope would have been prudent.  If they had already done the main tower, chances are decent that they may have climbed this and other minor pinnacles during their outing.  I'll work on the geometry of the shadows to try and better pin down the time of day (see comments).


     Onto the "real" sisters


The first of the sisters (sunlit tower) from the south
Sister 1(...I think) from the north.

Sister 2 (...I think) from the north.

X
Sister 3 - no shots


X
Sister 4 no real shots (looked like there was a good 4th class chimney on the north side)


Sister 5 from the north.

Sister 6 as seen from the 7th sister's summit.  Rough cairn visible.

Sister 7 (our summit) from the north.


Labels: , , , , ,

Wednesday, October 01, 2014

Font

Font is an excellent, rarely done scramble.  It probably is a touch harder than difficult on the modern easy-moderate-difficult scale.  There is a quarter pitch of 4th class / 5.3 and a long half pitch of 5.4-5.6.  Rock quality is quite good - for southern alberta.  Views are nice, and there are a number of different lines through the crux bands - provided you've got a rope and some gear.

The easiest way up the peak is via the Sage creek drainage.  This means a long drive in from the Corbin or Morrisey roads is required.  The Morissey road is well used so no 4x4 is needed.  I'm not totally positive about the Corbin access, but I remember it being a bit rougher (Subaru or 4x4 needed?).

The ascent has minimal deadfall.  Just head up a steep slide run with lots of beargrass for 2000ft or so.  After that you need to pick which side of the peak you want to ascend (north, south east, or other).

You can come in from the West Castle side, but bring a bike or quad as it makes for a long hike if you're on foot.

Here's an old video from the first generation of digital camera's (0.3MP).  I lost all pictures, so this is the only record I have.  This shows the ascent from the west (Sage creek side), and then up the south east face and south side of the summit pyramid.


The other route I know about ascends the north side via a stout, old school, 4th class chimney.  Harder options are possible.

Apparently the FA in the late 60's was via the south ridge / face.  The FA's were impressed with the north side chimney's but never ascended them.  Rick Collier indicates an easy ascent of the peak via some judicious route finding.  I'm not too sure there is a very easy way up, but I could be wrong.


UPDATE: As of 2021, here is a video showing the ?3rd? class ground on the north side of the peak


There is a very cool "font" or pedestal on the east side of the mountain.  It is reminiscent of desert tower blobs.  The base is very narrow and the top is a big round boulder.  I don't think anyone has been on top of it.  Native offerings were often left near the font.  People used to go up and collect the arrowheads, skulls, feathers etc.  No artifacts are left.  Archaeologists could probably find a fair bit of stuff if they dug around the nearby talus.

Labels: ,

Sunday, July 06, 2014

Trip Report: Sofa - Vimy Traverse (FIXED)

(Sorry about the pictures not loading.  This should fix it.)  First off, Chris Goble has posted a description here.  I thought I would do a write-up with some pictures and gps stuff (disclaimer - the way points were done with my phone gps and the route was pieced together from the way points and memory.  All lines on the pictures are approximations and were drawn by hand.  Everything is subject to inaccuracies and should be taken with a grain of salt).


I will try to use mostly pictures to reference the route.  I headed up the right ridge.  I have pictures at point 1 and then point 2.
()
Point 1

Point 2

The scrambling after point 2 isn't bad, you can easily stand and get your bearings.  After a short while you are back to scree.  You can then summit this point which has a survey marker.  After that, it's a walk to the summit of Sofa.

The summit of Sofa had only a Cairn.  From the summit, you head West down the "Sheep Shearer's Ridge" that is exposed and full of cool blocks of rock.


At the end of the ridge, you work your way up through the broken cliff band.  You basically traverse till you find what you like.


The last cliff has a few options.  I came up on the right side of the only tree on the upper cliff.  It's about halfway up the steep stuff.

One you reach the top, you traverse along the peak.  I didn't think it was worth the time.  As you come around, there is a predominant ledge that leads to what I would call ledge steps.   

This is the view from those steps.  Carefully traverse and step down to a plateau.  From here I traversed on the left side of these columns with the yellow lichen bands. 

At one point, I traversed upwards, switching to the inside/right side.  Here is the view from part of the way up.  I wish I had taken a picture of what it looked like.  Basically it looked easier than the left at this point.  Just a reminder.  If I figured I could go back down it, I didn't go up it.

After a short time on the right side, I peaked the ridge and started traversing the unknown peak on the left side again.  I went all the way around first and then doubled back up to the peak.  As you can see from below, it was an easy climb up.  A summit Cairn was at the top.

The next peak was much the same.  I traversed to the left, circling around to the next ridge and doubling back on the peak.  The ridge was high up, so there wasn't much vertical left to the peak.  This peak (Arras Peak) had a log book that you can enter your name into.

As you continue on, the ridge turns to the right.  I traversed on the right side, aiming towards this lone tree you can see in the next shot.

A short distance after the tree, the ridge plateau's and rolls over the top.  You continue on easy terrain till a row of trees forms and the ridge will drop off to the left.


This is the last ridge that drops and then rises to Vimy.  Right where the snow patch ends on the way up the ridge is where I started my sideways traverse.  I started at a shrub right above the snowpatch.


This is that shrub.

Eventually as you traverse, there is a break in the upper cliff band and I traversed closer along the top.  You can see that point here.

Finally, the summit looked as you see it, with these rather large blocks.

Finally, you descend onto an easy to find trail and exit.  I exited at the Chief Mountain Road, making for about a 30 km trip (I decided to bivy and make it an easier two day trip.)

It was a pretty surreal experience and I enjoyed the time alone on this one.  For anyone else thinking of doing it, I've included the Waypoints and Route in gpx format.  To look at it on Google Earth, here is the KML file, this file is slighlty different to match up with Google.  You can access all my files linked to this hike here and all my pictures here.  Enjoy!


Labels: ,

Saturday, November 07, 2009

Ridge Runs, Loops, Enchainments & Horseshoes

Most scramblers like putting on the miles high above the tree line, not down in valley bottoms. With that in mind, here is a list of some possible ridge runs and enchainments in the Waterton area.

There isn't too much sophistication in the selection process. Routes need to be easily achievable during a long day out by a fit scrambler. 20km to 30km of travel is average, with most of that being off trail. Because things are on ridges, I tend to ignore elevation gain (I usually ignore it anyway as it is just a pain to calculate and tends to be a number chasing hobby like peakbagging). Route difficulty can be quite varied, but doesn't involve any 5th class climbing. Route finding is mainly limited to picking your way up weaknesses.


Dragon's Back (Akamina or Forum ridge)
Length:
Distinct summits: 4
Named peaks: 1

Technical crux: 3rd class
Technical consistency: One ~100m section of scrambling
Special considerations: n/a

Best part: Lots of distance looking at gorgeous peaks
Worst part: Deciding if the top of the early descent gully is too steep
The phrase that sums it up: Gorgeous vies of quintessential snow capped Rocky Mountains

Physical wear and tear: Moderate
Route Quality: ***

Dragon's Back Route Description: Since most scramblers are keen to gain as many summits as possible, I'll describe this trip via its original route: via Forum peak instead of via the ridge between Forum lake and Wall lake.

Hike to Akamina pass to ascend up to Forum peak. Head west, running the easy ridge above Forum and Wall lakes. As you start down to Bennet's pass most people shorten the trip by dropping down the snow and shale slope leading to the hanging valley just north west of Wall lake. Return to your car via the Wall lake trail.


Hawkins Horshoe
Length:
Distinct summits: 5
Named peaks: 3

Technical crux: 5m of 4th class chimney through Blakiston's black purcell
Technical consistency: Limited to one ~50m section on Blakiston
Special considerations: n/a

Best part: Can you ever get tired of looking at Lineham lakes?
Worst part: Lots of backsliding up Blakiston's south face
Distinguishing characteristic: Usually the first "hard" ridge run

Physical wear and tear: Moderate
Route Quality: ***

Hawkins Horshoe Route Description: Hike up the Lineham creek trail until you get to the last open creek. Slog up the open talus slope to Blakiston negotiating a small band of black purcell (4th class) and some additional 3rd class ledges which lie above this. Run the easy rounded ridge back west to Hawkins before encountering the Tamarack trail south of the peak. Head east to Lineham and ski down the talus slope to arrive at the junction to lower Rowe lakes. Walk a couple km back down the Akamina Highway to return to your car.


Anderson - Lost - Bauerman
Length:
Distinct summits: 4
Named peaks: 4

Technical crux: 4th class chimney through Blakiston's black purcell
Technical consistency: Intermittent. 3 or 4 technical sections around Lost and Kootenai Brown peaks
Special considerations: Good scrambling is found on Anderson's right hand skyline

Best feature: Varied scrambling on clearly distinct peaks
Worst feature: Long walk out from Twin Lakes
The phrase that sums it up: Packing a summer into one push!

Overall trip difficulty: Moderate
Route quality: ***

Anderson - Lost - Bauerman Route Description: Hike up the trail past Blakiston falls until you can head up one of the drainages leading to Anderson. Go to the right skyline for some unnecessary but very fun bits of scrambling. Run the ridge through Lost, Kootenai Brown and Bauerman peaks. Expect varied scrambling around the first two peaks. Drop down to Lower Twin lakes and make the long walk back out to Red Rock canyon.


East Ridge of Glendowan to Newman

Length:
Distinct summits: 5
Named peaks: 2

Technical cruxes: several short 4th class sections
Technical consistency: sustained
Special considerations: sustained

Best feature: Exposed ridge lines
Worst feature: Hot and dry
The phrase that sums it up: Intimidating for just the right amount of time

Overall trip difficulty: Difficult
Route quality: ***

East Ridge of Glendowan to Newman Route: Start at Red Rock canyon. Hop the fence on the upper bridge and cut up the south ridge of the unamed 8500+ peak which sits between Cloudy Ridge and Glendowan. Follow the ridge's crest via short technical bits and lots of 3rd class terrain. One on the ridge crest drop down the saddle before starting up more interesting scrambling through black purcell lava to gain Glendowan's summit pyramid and yet more scrambling. Continue west with one short difficulty exposed section. Ascend a couple more unnamed peaks before getting to Newman which is situated at the north end of Goat Lake. Follow the Avion Ridge trail down into Goat Lake and then out the Goat Lake trail back to Red Rock.


Galwey to Cloudy Ridge (Red Rock Rim)
Length:~20km
Distinct summits: 5 to 7
Named peaks: 3 or 4

Technical cruxes: several short 4th class sections
Technical consistency: intermittent
Special considerations: bring lots of water

Best feature: Exposed ridge lines forever
Worst feature: Hot and dry
The phrase that sums it up: Go for the gusto

Overall trip difficulty: Difficult
Route quality: ***

Start at Coppermine creek and head up Galwey. Descend to the shoulder and follow the ridge all the way to Cloudy Ridge. You have the option of avoiding some minor peaks. At the last minor summit before Cloudy Ridge, put in the extra effort to gain this last summit and backtrack back to the descent ridge. See the Red Rock Rim Traverse post for more precise descriptions.

You can beef up this full day by starting up Bellevue Hill. The Full Monty involves heading up the technical route on the East Ridge of Yarrow (aka South East buttress of Spread Eagle aka East ridge of Spionkop) and running this past the crux section north of Cloudy and as far along the ridge as one can go. So far I haven't heard of anyone doing this 40km or so traverse.


Sofa to Vimy

Length:
Distinct summits: 5
Named peaks: 2

Technical cruxes: exposed 4th/5th class traverse
Technical consistency: intermittent
Special considerations: technical crux at halfway point

Best feature: The "Sheep Shearer's Ridge"
Worst feature: Heat exhaustion
The phrase that sums it up: You'll know if your in shape or not

Overall trip difficulty: Difficult
Route quality: ***

Sofa to Vimy Traverse Route: At the first unmarked pullout just past the Chief mountain view point, wander through the grass to find the unmarked Sofa Ridge trail. The trail is in good shape so take some time to find it. At the hanging valley either head directly up the backside of the bowl on cement hard dirt, or do some very fun 3rd to easy 4th class scrambling on the right hand ridge. Follow the rounded summit ridge south east to Sofa's true summit. Head west along an interesting section of ridge. After the next minor summit an exposed 4th/5th class traverse is needed to keep your elevation. After rounding the next minor summit above the old Crypt Lake campground, most of the work is done. The ridge north to Vimy has one more bump to it. From Vimy peak, it is a long walk out to the Marquis Hole where you can wade across the creek to meet your shuttle vehicle.

This is one of my favorite ridge runs. It doesn't have the continual exposure of the Red Rock area, but the test of faith halfway through is fun, and it is just the right length for a full day. Plus, unlike other ridge runs, you can't piece it together in parts.


Carthew to Buchanan Ridge
No route description yet. Most people drop down to Carthew lakes before heading back up to Buchanan Peak. The ridge run sticks to the top of the ridge, busting through one difficult section, avoids the minor subsidiary summit which is the named peak (Buchanan peak) and continues all the way down the ridge to come out at the Crandell Lake pullout.


Avion Ridge

Length:
Distinct summits: 1
Named peaks: 1

Technical cruxes: none
Technical consistency: none
Special considerations: none

Best feature: Tamaracks in the Fall
Worst feature: Thinking of the bike you could have stashed at the Goat Lake fork.
The phrase that sums it up: Many people's milestone

Overall trip difficulty: Moderate
Route quality: ***

Avion Ridge Route: Head up Goat lake. Follow the trail up the end of the valley to the saddle. Cut left and come out via Lost Lake. This is about as well established a ridge run as you can get. See the avion ridge post for more detail.


Others
  • There is lots of great ridge running terrain just north of the Park. Pick a side valley and follow it over to Red Rock or another side canyon.
  • The Tamarack Trail ridge. Lots of people are starting to do this as part of the continental divide fad. Lots of bushiness and not many good views.


Labels: ,

Monday, September 21, 2009

Red Rock Rim Traverse (Galwey - Dungarvan - Cloudy Ridge)

Length: ~18km
View-o-meter: 4/5
Scrambling Difficulty: Difficult
Total Trip Difficulty: Difficult
Best Feature: Ridge running on the edge of the prairie
Worst Part: A bit of sidehilling north of Galwey

Background
The East Rim of the Red Rock Canyon parkway is a scrambler's dream. The terrain has lots of accessible, moderate, and relatively non-committing scrambling for a long ridge run. The overall distance of this trip isn't too bad. While you only gain three (or two) named peaks, you cut across three (or four) more unnamed ones.

Route Description
There are a couple of ways to start things out
  1. Bellevue Ridge - This adds a couple of km (and hours) to the trip. It also cuts out some of the difficulties on other ascent ridges, however it doesn't change overall technical difficulties.
  2. Galwey - You get to ascend via a pretty good trail, but have to make up for this with an extra bit of distance of sidehilling shale above some ledges
  3. West ridge of the unnamed peak north of Galwey - You get some very nice scrambling, but miss out on Galwey's peak.

Since most scramblers will have done Galwey, and since you have to do some rather unpleasant sidehilling if you ascend this way, I would recommend heading up the West ridge of the unnamed peak north of Galwey.

Start at the Coppermine Creek parking lot. Walk back down to the main road and walk up the pavement for a few hundred meters. This will avoid a bit of thorny bushes you otherwise have to wade through if you head straight across the creek.

The ridgeline is open and easy to ascend. It is similar to many of the other ridges in this area - minus any annoying deadfall.

The lower ridge line which leads from Red Rock to the unamed peak just north of Galwey


Beautiful scrambling leading up to the unamed peak just north of Galwey. Another shot


As the ridge steepens, you'll hit a 20m headwall. There is a 4th class chimney you can head up, however, I suspect most people will traverse over a few hundred meters to get to some 3rd class terrain. A few more sections of 3rd class ledges exist before the unamed summit pyramid.

South West ridge of the unamed peak just north of Galwey


3rd class scrambling leading to the unamed peak just north of Galwey

The summit pyramid has some very nice, solid fossil algae. The scrambling is 4th class and quite fun.

The summit pyramid of the unamed peak just north of Galwey as seen from the north (easy 4th class)

This unnamed peak has excellent views back down to Galwey. Getting to the saddle before Dungarvan requires either heading up to the ridge line where you eventually run through a few ledges, or doing a long side hill on an intermittent sheep trail. The saddle itself has a nice little meadow.

A rather imposing band of fossil algae appears to bar progress up to Dungarvan. However, as you get to the base of this band, a couple of 3rd -maybe easy 4th class gullies appear.

3rd class gullies through the fossil algae band protecting Dungarvan's south-east ridge
Continue heading up the red shale bands leading to Dungarvan. The further left you traverse on Dungarvan's peak, the easier the scrambling is. The early chimmneys range from 5th to 4th class. The easiest route is on a ramp that is mainly 3rd class with perhaps one move of 4th class. However, the terrain on the east side of the pyramid is very exposed, so, while things are 3rd class, most people will take things very gently.

Dungarvan. The suggested traverse goes from right to left.
From Dungarvan's peak, continue heading down the ridge to the north on mostly 2nd class terrain. At the next saddle you will have to expend a bit of energy cutting left to avoid the difficulties on the arete. You can cut things down to 3rd class, so watch out you don't get suckered into things that are harder than you want.

It is possible to avoid this unnamed peak by traversing along a goat trail partway up. This takes off on the right side of the ridge about half-way up.

Cloudy ridge on the right and the unamed peak on the left from which the descent ridge leaves

The rest of the way over to Cloudy Ridge is similar to a lot of other terrain already covered. At the saddle before Cloudy Ridge you will have to do one or two semi-exposed 3rd class steps.

From Cloudy Ridge's peak, go back down to the last unnamed summit and descend its southwest ridge. Surprisingly, there is no real scrambling anywhere on the descent. As you get to the grassy terrain, stick to the nose. You should be able to make it within a 100m of the creek bed without any deadfall. Near the bottom, but right. The left (south) fork of Red Rock canyon has a 20m-30m waterfall that, while extremely picturesque could hang you up.


Descending to Red Rock canyon via the south west ridge of Cloudy Ridge


Heading out Red Rock canyon is extremely easy and picturesque. Recent floods have filled the river bottom with nice gravel. The steep canyon walls are reminiscent of Utah slot canyons. Just before you get to the upper Red Rock canyon bridge, you hit a huge log jam. Drop down a fun little cave to make it out to the parking lot.

Useful Posts


Labels: ,

Friday, August 21, 2009

Glendowan

Height: 8,770
View-o-meter: 4/5
Scrambling Difficulty: Difficult
Total Trip Difficulty: Moderate
Best Feature: Nice summit pyramid
Worst Part: Deadfall before gaining the ridge


Glendowan and other nearby peaks as seen from Anderson

Glendowan is located just north of Red Rock canyon. It sits along the front range ridge that houses several other popular scrambles, like Dungarvan and Galwey. This is a quintessential scrambler's summit. There are no technical (5th class) routes to the summit, but neither are there any walk ups. All approaches require good scrambling skills.

A number of routes to the summit are possible:
1. The west ridge from Newman peak (short exposed, difficult sections with most of the route being 2nd class)
2. The south ridge from the Snowshoe cabin trail (lots of deadfall at the start and some good scrambling near the upper purcell)
3. The east ridge from Cloudy Ridge and the unamed 8500+ peak (expect to run the most difficult ridgeline in the park)
4. The north bowl from the south fork of Yarrow

From my perspective the most aesthetic and enjoyable way to the summit is via the south ridge of the unamed 8500+ peak which lies between Glendowan and Cloudy Ridge. This ridgeline starts on the west side of the Red Rock canyon. It avoids much of the nasty bushwhacking which characterizes Glendowan's proper south ridge. Instead of spending time on the Snowshoe cabin road, you spend extra time on the ridges. Peakbaggers and those who are out of shape may not relish the extra unamed peak that is (nearly) ascended, but if you are looking for some high quality scrambling and some fun, semi-technical ridge running, that just keeps on going, this is probably a good route to try. The suggested finish is down the west ridge over to Newman and out Goat Lake, but this is merely one among many options.

Glendowan via the South Ridge of the Unamed 8500+ Peak
Park at Red Rock canyon and take the paved trail that heads up the canyon. When you cross over to the west side of the bridge, hop over the fence and start bashing up the ridge. The deadfall through here isn't very nice, but it is a heck of a lot better than the stuff you'll find in many other places above the Snowshoe cabin trail (think South ridge of Glendowan or any of the other side valleys from here up to Lost Lake).


The deadfall just after hopping the Red Rock canyon fence. It gets worse further up the Pass Creek valley. You can also bypass all deadfall by hiking up the Snowshoe trail for about 1/2km to the first open hillside - HT Blair.

The open hill side provides a welcome relief. Expect maybe 15 min of bushwacking.


The open slopes looking back down to Red Rock

Follow the ridge line though the intermittent groves of trees. The trees tend to be thinner on the windward, left hand, side.


Looking at some spectacular scrambling terrain on the south ridge of the Unnamed 8500+ peak which sits between Glendowan and Cloudy Ridge

The first crux comes at a junction of Black Purcell Lava.


The first crux band. 4th class

As with most things in the Park, it looks much harder than it is. Getting to the shelf on the right hand side of the first limestone band is not too tough (hard 3rd class- maybe 4th class). This lets you duck around right on what looks like a game trail. 15 feet or so of 4th class terrain gets you on top of the Purcell Lava. If the route finding on this crux section stymies you, or the scrambling is at your limit, you may want to think about cutting the day short instead of getting hung up in the more exposed but technically easier ground that is found near the ridge crest.

While the ridge continues to look intimidating numerous easy ledges can be threaded to make for easy going with little if any backsliding. One band of rotten brown limestone looks challenging, but is easily threaded up a talus gully on the left. In general the left side of the ridge usually has the line of least resistance.


Ledge threading at it's best. How can something that looks so hard from afar prove so easy up close.

The next difficulty is the notorious Fossil Algae band. Luckily a moderate bit of 4th class climbing heads through what otherwise would be a technical show stopper. A small spruce tree marks the weakness left of the arete's headwall (in this picture the small tree is almost hidden in shadows). The hardest climbing lasts only up to the first ledge (20 feet), after which things ease up a bit while the exposure continues to grow. Luckily the rock is pretty good and holds are relatively plentiful (from a climber's perspective)


The 2nd crux through the fossil algae (4th class)

Some more easy scrambling gets you up towards the ridge line. At the ridge crest, you will probably want to cut right to gain one of the many false summits of the unamed 8500+ peak. While the true peak lines a ways back along the ridge, getting to one of the small summits is easy and gives you nice views down to Cloudy Ridge and Glendown. The Yarrow side of the ridge looks like it has a nice shale traverse that leads to the actual peak. You can continue over to Cloudy Ridge and Dungarvan this way, but expect things to be exposed and technical.

After gaining the ridge crest you will need to drop west down towards Glendowan. This presents no problems. Several good goat trails exist over here, and chances are pretty good you will see some of the herd.


The west ridge of the Unamed 8500+ peak which leads towards Glendowan. This is what you descend on your way over to Glendowan

The ascent back up Glendowan's east ridge has some fun scrambling. The going is easiest on the intermittent goat trails on the right (Yarrow) side of the ridge.


The east ridge of Glendowan as seen from the Unnamed 8500+ ridge.

Scrambling back up towards Glendowan is mainly 3rd class. A few short sections of knife edge ridge are 4th class. They are reminiscent of Crandell's knife edged south ridge - albeit much shorter. This section can be largely avoided by staying low on the right via the goat trails.

The rock is entirely purcell lava and while broken and lichen covered tends to be fairly stationary. This is as close to a "granite" experience as you'll have in the park.


Fun times on good rock. 3rd & 4th class

The Purcell lava helps to give the peak an ominous flare. It guards the flanks to the brown shale summit pyramid rather nicely. You are never really sure if there is another way down besides the one you just ascended. As you traverse around to the left (west) of the pyramid several possible weaknesses open up. Routes range from 3rd to 4th class. Chances are pretty good that near the top you will need to traverse left to gain the actual summit. Different, more direct descent routes from the summit are possible.


The routes up this shale face start off as stiff 3rd class. Around the corner to the left, other more sustained 3rd and 4th class routes are possible. A nice chimney/gully can be followed directly down from the summit although you may need to cut east (climber's right) to avoid some of the more vertical sections

Descend either via the south ridge (watch out for lots of deadfall at the end), over to Newman or via the ascent route. If your route finding skills and scrambling confidence aren't quite good, picking your way down through the purcell and fossil algae along an unknown route like the south ridge (or if that is ascended the south ridge of unnamed) may not be the wisest idea. I would suspect heading down the south ridge of Glendowan blind is easier than heading down the south ridge of Unamed 8500+ blind. Scrambling down the face of the upper purcell to gain Glendowan's south ridge may be a bit long and exposed, but a blind descent of the fossil algae band on the south ridge of the unnamed 8500+ is probably more dangerous and intimidating.


Other Route Descriptions

Nugara's scrambling page - A very good description of an ascent of the south ridge of Glendowan.

Bob Spirko's scrambling page -An early season ascent via the south ridge and descent via the drainage ?north? of the south ridge

Club tread trip report

Trevor Helwig's blog - Mainly pictures of the south ridge with a short description of the traverse over to Newman.

.

Labels:

Email me